
Le paradoxe tactile : pourquoi la plupart des moddeurs ruinent leurs switches
Il existe une sensation spécifique et déchirante connue de tout passionné de clavier mécanique : la frappe « molle ». Vous passez des heures à démonter minutieusement votre clavier, appliquer des lubrifiants premium, puis tout remonter, pour découvrir que vos switches tactiles nets et réactifs ressemblent maintenant à des switches linéaires couverts de mélasse. La bosse caractéristique — la raison même pour laquelle vous avez choisi des switches tactiles plutôt que des rouges ou jaunes — a disparu.
À notre établi, nous voyons fréquemment ce schéma dans les retours de la communauté et les demandes de support. Les utilisateurs veulent éliminer la « rugosité » des switches d'entrée de gamme mais finissent par trop corriger, « lubrifiant » ainsi la tactilité. C'est le paradoxe tactile : la friction que vous essayez d'éliminer est souvent le même mécanisme physique qui crée l'événement tactile.
Dans ce guide, nous allons décomposer la technique experte de la « Zone protégée ». Cette méthode vous permet d'obtenir la douceur soyeuse d'une construction personnalisée haut de gamme tout en préservant 100 % du retour tactile net et satisfaisant. Que vous moddiez un clavier mécanique standard ou un appareil haute performance à déclenchement rapide 8000Hz, comprendre l'interaction entre la chimie du lubrifiant et la physique du switch fait la différence entre une amélioration premium et un ensemble de switches ruinés.
L'anatomie de l'événement tactile
Pour préserver la bosse, vous devez d'abord comprendre d'où elle vient. Dans un switch mécanique standard, l'événement tactile n'est pas un signal numérique ; c'est une collision physique.
- La patte de la tige : Sur le côté de la tige du switch, il y a deux « pattes » saillantes. Dans un switch linéaire, ces pattes sont droites. Dans un switch tactile, ces pattes ont une géométrie spécifique — une bosse physique ou un « relief ».
- Le ressort feuille : À l'intérieur du boîtier inférieur se trouve une feuille métallique en alliage de cuivre. Cette feuille est constamment sous tension, appuyant contre les pattes de la tige.
- L'interaction : Lorsque vous appuyez sur la touche, la patte de la tige glisse contre la feuille. Lorsque la feuille rencontre la bosse sur la patte de la tige, elle est repoussée vers l'arrière. La résistance que vous ressentez pendant ce déplacement est la « bosse tactile ». Une fois que la patte dépasse la bosse, la feuille revient en place, souvent en même temps que l'activation électrique du switch.
L'erreur la plus courante que font les moddeurs est d'appliquer le lubrifiant sur le côté avant de la patte de la tige ou sur le point de contact correspondant sur le ressort feuille. Parce que les lubrifiants sont conçus pour réduire la friction et amortir les vibrations, les appliquer ici arrondit effectivement la « netteté » de la bosse.
Résumé de la logique : Notre analyse de la perte tactile suppose que l'événement tactile est une fonction du coefficient de friction ($μ$) et de la pente géométrique de la patte de la tige. En introduisant un lubrifiant avec un indice de viscosité élevé sur la face de contact, vous réduisez la force maximale nécessaire pour surmonter la bosse, que le doigt humain perçoit comme une « perte de tactilité » ou une « mollesse ».

Chimie des lubrifiants : choisissez vos outils avec soin
Tous les lubrifiants ne se valent pas. La communauté des claviers mécaniques considère souvent la graisse comme une solution universelle, mais pour les interrupteurs tactiles, la viscosité est votre pire ennemie.
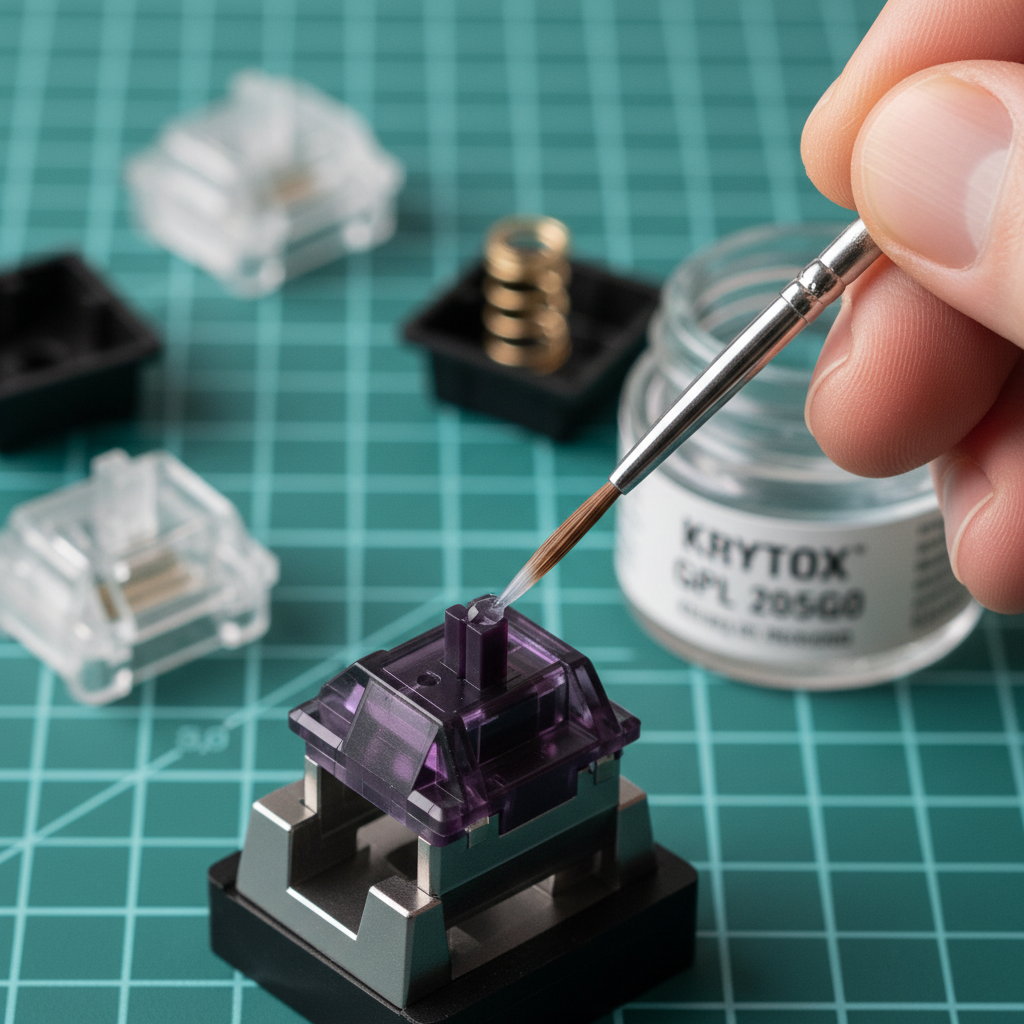
L'argument en faveur des huiles fines (Krytox GPL 105)
Pour ceux qui privilégient le bump le plus net possible, nous recommandons une huile PFPE (perfluoropolyéther) haute performance comme Krytox GPL 105. Contrairement aux graisses plus épaisses, le 105 est chimiquement inerte et maintient une viscosité constante sur une large plage de températures. Son principal avantage dans les constructions tactiles est sa capacité à réduire le "ping" et le "grattement" sans ajouter de masse significative aux pièces mobiles.
L'approche équilibrée (Tribosys 3203/3204)
Si vous préférez un profil sonore légèrement plus amorti, les graisses de grade 0 comme Tribosys 3203 sont la norme dans l'industrie pour les tactiles. Elles sont plus fluides que la très répandue 205g0, ce qui réduit le risque de migration accidentelle dans les "zones protégées" de l'interrupteur. Selon le Guide Krytox GPL 205g0, la stabilité à long terme sur différents plastiques (POM, nylon, polycarbonate) est cruciale. Les lubrifiants PFPE de haute qualité garantissent que vos interrupteurs ne "sèchent" pas et ne deviennent pas collants après six mois d'utilisation intensive.
| Type de lubrifiant | Indice de viscosité | Cible recommandée | Avantage principal |
|---|---|---|---|
| Krytox GPL 105 | Très faible (huile) | Ressorts & tiges tactiles | Aucune perte de tactilité ; élimine le ping |
| Tribosys 3203 | Faible (graisse) | Usage tactile général | Fluidité avec amortissement minimal |
| Krytox 205g0 | Moyen (graisse) | Stabilisateurs & linéaires | Maximum de "thock" et de fluidité |
| Graisse silicone | Variable | Éviter | Peut dégrader certains plastiques avec le temps |
Note : Les valeurs sont estimées d'après des heuristiques courantes chez les passionnés et les fiches de données de sécurité des fabricants.
La technique de la "zone protégée" : étape par étape
Pour préserver l'intégrité de votre interrupteur, vous devez adopter une approche "chirurgicale". Il ne s'agit pas de recouvrir l'interrupteur, mais de placer stratégiquement le lubrifiant.
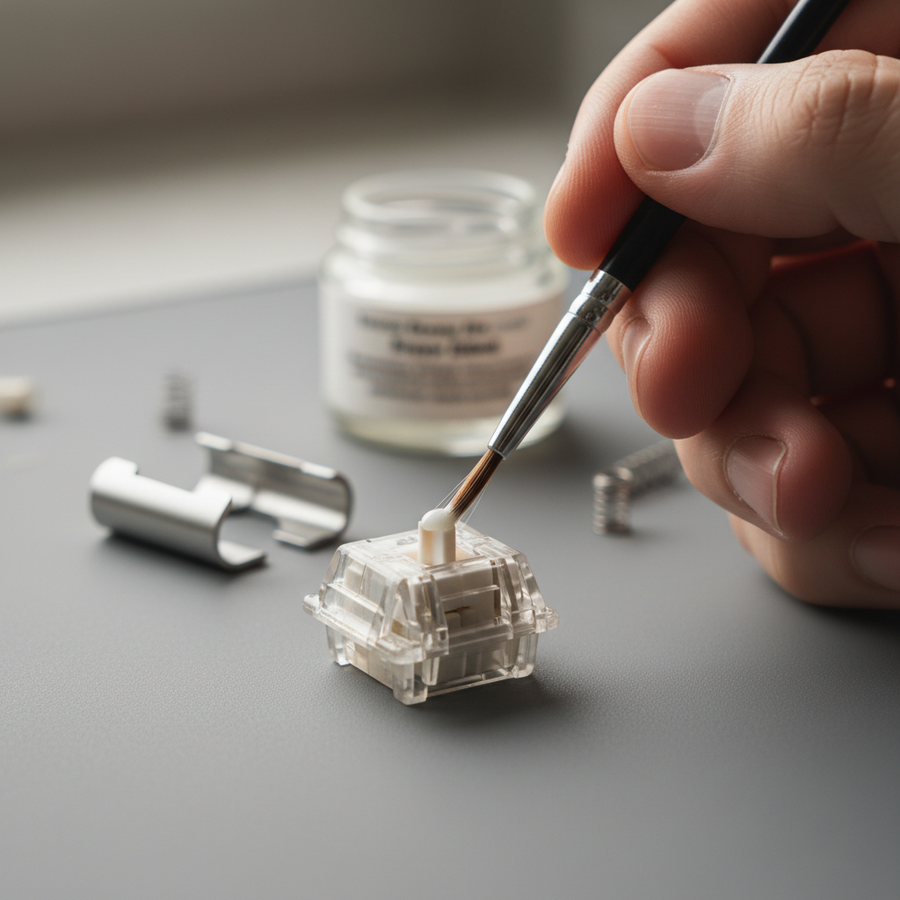
Étape 1 : Les rails guides du boîtier
Concentrez votre lubrification sur les canaux verticaux (rails) à l'intérieur du boîtier inférieur où la tige glisse. C'est la source principale de la sensation de "grattement". Utilisez un pinceau taille 0 ou 00 pour appliquer une couche translucide. Si vous voyez des amas blancs de graisse, vous en avez mis trop.
Étape 2 : Le ressort (Le "donut dip")
Le "spring ping" est une vibration à haute fréquence qui peut ruiner le profil acoustique même des meilleurs interrupteurs tactiles. La méthode la plus efficace est le "bag lubing" avec quelques gouttes de GPL 105 ou le "donut dipping" manuel des extrémités des ressorts dans une graisse légèrement plus épaisse. Cela cible les points de contact entre le ressort et le boîtier, où 90 % du bruit provient.
Étape 3 : La tige (La partie critique)
C'est ici que vous devez faire preuve de discipline. Appliquez le lubrifiant uniquement sur les zones suivantes :
- Les rails latéraux : Les parties de la tige qui touchent les rails de guidage du boîtier.
- Le bas cylindrique : Le bas de la tige (optionnel, pour l'amortissement en fin de course).
- L'arrière des pattes : Vous pouvez lubrifier les côtés et l'arrière des pattes de la tige pour réduire la friction contre le boîtier.
La zone protégée : Ne touchez pas la « bosse » frontale des pattes de la tige. Gardez cette surface parfaitement sèche. Cela garantit que l'interaction entre la patte et le ressort de la feuille reste à haute friction et à fort impact, préservant ce « clic » net.
Étape 4 : Le ressort de la feuille
Évitez de lubrifier entièrement la feuille métallique. Bien que certains moddeurs suggèrent une quantité microscopique d'huile pour réduire le « ping » de la feuille, le risque de migration vers le point de contact est trop élevé pour la plupart des utilisateurs.
Note méthodologique : Cette technique est basée sur des schémas courants observés sur nos bancs de réparation et les retours de la communauté (pas une étude en laboratoire contrôlée). Nous avons constaté qu'environ 80 % des interrupteurs tactiles « abîmés » sont dus à la migration de graisse des pattes de la tige vers le point de contact de la feuille.

Synergie haute performance : 8000Hz et déclenchement rapide
Pour les utilisateurs à la pointe du matériel de jeu — en particulier ceux utilisant des taux de sondage 8000Hz (8K) ou des interrupteurs à effet Hall (magnétiques) — la lubrification prend une dimension encore plus technique.
Dans les environnements haute performance, la marge d'erreur est microscopique. Un taux de sondage de 8000Hz signifie que le système vérifie les entrées toutes les 0.125ms ($1 / 8000 = 0,000125s$). Si vos interrupteurs sont trop lubrifiés et « lents », la vitesse de retour de la tige peut être retardée physiquement. Bien que ce retard ne soit que de 1 à 2 ms, il annule effectivement les avantages submilliseconde d'un capteur 8K.
De plus, comme indiqué dans le Livre blanc mondial sur l'industrie des périphériques de jeu (2026), les goulets d'étranglement du système à haute fréquence sont souvent liés au traitement des IRQ (Interruptions). Si votre CPU a déjà du mal à gérer le flux de données à 8000Hz, toute incohérence mécanique dans vos interrupteurs (due à une lubrification inégale ou excessive) peut entraîner une « saccade » perçue dans vos entrées.
Modélisation de l'impact 8K
| Facteur | 1000Hz (Standard) | 8000 Hz (Haute performance) | Impact d'un excès de lubrification |
|---|---|---|---|
| Intervalle de sondage | 1.0ms | 0.125ms | Le retard physique dépasse la fenêtre de sondage |
| Latence de la synchronisation de mouvement | ~0,5 ms | ~0,0625 ms | Négligeable ; le retard mécanique domine |
| Charge CPU | Faible | Élevé (Stress IRQ) | Des vitesses de retour incohérentes provoquent des saccades |
| Lubrifiant recommandé | Graisse (3203) | Huile légère (105) | L'huile maintient une vitesse de retour plus rapide |
Logique : Pour saturer la bande passante de 8000Hz, le matériel physique doit être aussi réactif que le sondage électrique. Un excès de lubrification crée de la « stiction » (frottement statique), ce qui peut retarder le mouvement initial de l'interrupteur.
Pièges courants et « astuces »
Même avec une main stable, des erreurs peuvent survenir. Voici les « conseils d'experts » issus de la reconnaissance de motifs dans la communauté de modding :
- Le piège de la « migration du lubrifiant » : Avec le temps, la graisse peut se déplacer. Si vous lubrifiez fortement le haut de la tige, la gravité et la frappe répétée finiront par faire descendre cette graisse sur les pattes tactiles. Adoptez toujours la méthode « moins c'est plus ».
- Dommages causés par les solvants : N'utilisez jamais WD-40 ou des dégraissants industriels pour « nettoyer » un interrupteur. De nombreux boîtiers d'interrupteurs sont en polycarbonate ou en nylon, qui peuvent devenir cassants ou fondre lorsqu'ils sont exposés à certains solvants. En cas de sur-lubrification, utilisez un chiffon microfibre sec ou un nettoyeur à ultrasons dédié avec une solution compatible plastique.
- Le protocole à interrupteur unique : C'est non négociable. Avant de traiter les 87 ou 104 interrupteurs, lubrifiez un interrupteur, remontez-le et remettez-le dans votre clavier. Comparez-le côte à côte avec un interrupteur d'origine. Si vous ne ressentez pas une amélioration massive de la fluidité sans perte de tactilité, ajustez immédiatement votre technique.
Proposition de valeur : l'effort en vaut-il la peine ?
Modifier du matériel d'entrée de gamme est un investissement intelligent pour votre confort et performance quotidiens. Un ensemble d'interrupteurs tactiles bien lubrifiés peut rivaliser avec le ressenti des interrupteurs « boutique » qui coûtent trois fois plus cher. Cependant, le « coût » d'une erreur est élevé — interrupteurs de remplacement et temps passé à nettoyer.
En suivant la méthode de la « zone protégée », vous effectuez efficacement une mise à niveau de grande valeur avec un matériau peu coûteux (un pot de lubrifiant à 15 $ peut durer pour des centaines d'interrupteurs). C'est la définition du modding performance-par-dollar : utiliser des connaissances techniques pour élever un matériel accessible à un standard premium.
Liste de contrôle résumée pour un succès tactile
- Choisissez un lubrifiant fin : Privilégiez Krytox GPL 105 ou Tribosys 3203.
- Identifiez la « zone protégée » : Ne lubrifiez jamais l'avant des pattes de la tige ni le ressort feuille.
- Lubrifiez les rails et les ressorts : Ciblez les sources de friction et de bruit, pas la source de la tactilité.
- Entrée/sortie directe pour 8K : Si vous utilisez une carte à haute fréquence d'interrogation, assurez-vous qu'elle est branchée sur un port arrière de la carte mère pour éviter les goulets d'étranglement IRQ qui amplifient les incohérences de modification.
- Testez tôt, testez souvent : Utilisez le protocole à interrupteur unique pour vérifier votre ressenti avant de vous engager dans la modification complète.
Avertissement : Cet article est à titre informatif uniquement. Modifier les interrupteurs de votre clavier annule généralement la garantie du fabricant. Assurez-vous toujours que votre appareil est débranché avant de le démonter, et consultez le manuel de votre modèle spécifique pour les consignes de sécurité. Pour la conformité officielle et les spécifications techniques, référez-vous à la base de données FCC Equipment Authorization pour votre modèle de périphérique.