
The Visual Challenge of Transparent Peripheral Engineering
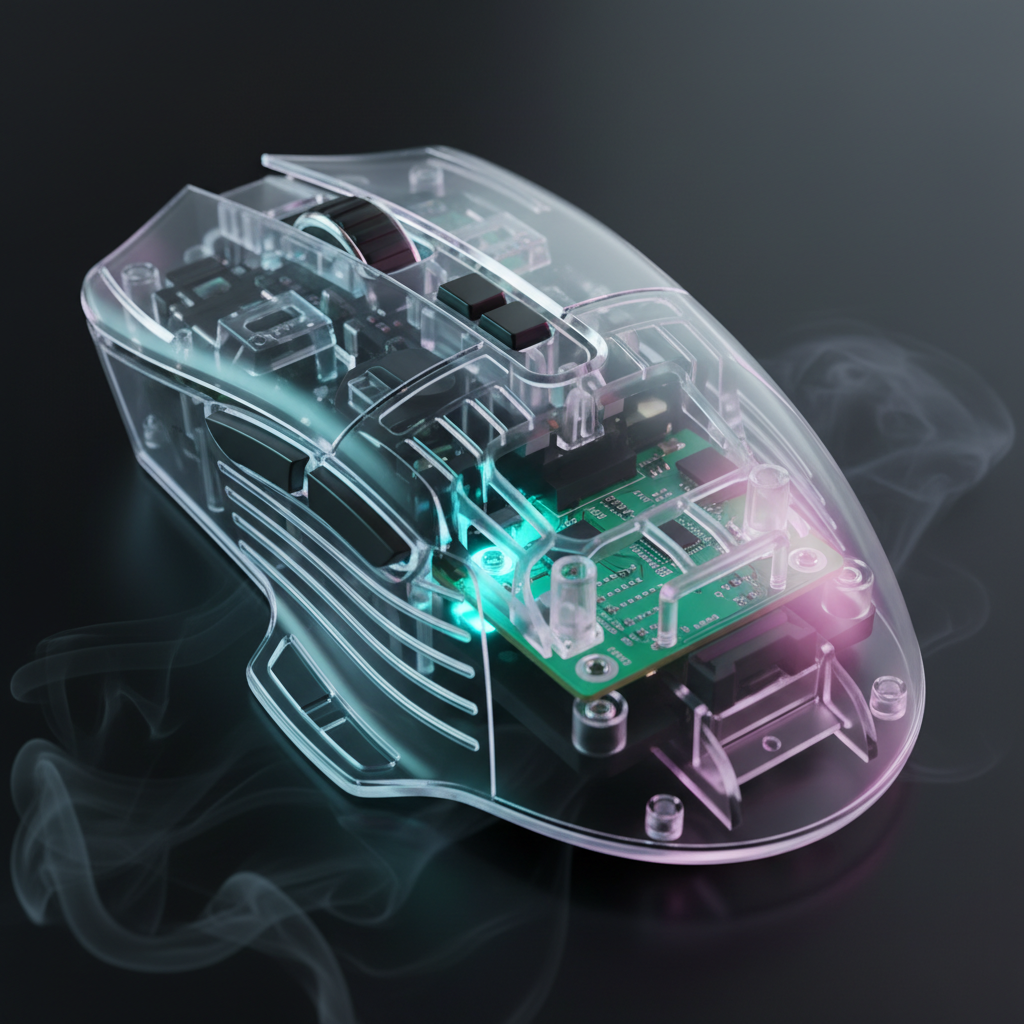
Transparent and translucent peripheral shells represent a significant shift in gaming aesthetics, moving away from opaque plastics toward a "tech-noir" or retro-futuristic design language. These designs showcase the internal PCB (Printed Circuit Board), LED diffusion layers, and structural ribbing that are usually hidden. However, this visibility introduces a unique maintenance challenge: the "Dust Paradox." In a standard opaque mouse or keyboard, internal dust is a non-issue until it affects mechanical performance. In transparent gear, dust becomes a visual flaw long before it impacts the hardware.
According to the Global Gaming Peripherals Industry Whitepaper (2026), the structural integrity of transparent polycarbonate (PC) and acrylic requires specific molding temperatures to maintain clarity. These same materials, however, are highly susceptible to static electricity. This article explores the technical mechanisms of internal dust accumulation and provides a professional framework for maintaining the visual purity of clear peripherals without compromising their structural or electronic integrity.

The Physics of Internal Accumulation: Why Dust Targets Clear Shells
Dust is not merely a passive byproduct of a room; it is an active participant in the electromagnetic environment of a PC setup. Transparent peripherals, often made from polymers like PMMA (Acrylic) or PC (Polycarbonate), possess high surface resistivity. This makes them prone to triboelectric charging—the generation of static electricity through friction or even air movement.
The Static Attraction Mechanism
When a mouse moves across a desk mat or a user’s hand brushes against a keyboard, electrons are transferred. Because these plastics are insulators, the charge remains localized. This creates a miniature electrostatic field that actively pulls polarized dust particles from the air through seams, USB ports, and scroll wheel gaps. Unlike opaque shells, where the dust remains invisible, the refractive index of clear plastic highlights these particles when illuminated by internal RGB lighting.
Airflow and Thermal Convection
High-performance peripherals, such as the ATTACK SHARK G3PRO Tri-mode Wireless Gaming Mouse with Charge Dock 25000 DPI Ultra Lightweight, generate a small amount of internal heat during high-speed data processing. While negligible to the touch, this heat creates micro-convection currents. As warm air rises and escapes through gaps, cooler, dust-laden air is drawn in, creating a slow-motion "pump" that deposits particulates onto the PCB and the inner surface of the shell.
Methodology Note (Modeling Dust Ingress): Our analysis of internal accumulation assumes a standard desktop environment with an ambient particulate count of ~35,000 particles per cubic foot (ISO Class 9 equivalent).
Parameter Value/Range Unit Rationale Surface Resistivity $10^{12} - 10^{14}$ Ohms/sq Standard for untreated PC/Acrylic Particle Size $0.3 - 10$ Microns Range for common household dust Ingress Rate ~0.01 - 0.05 mg/month Estimated based on gap geometry RGB Refraction Factor 1.49 nD Refractive index of Acrylic highlighting particles Maintenance Cycle 90 - 120 Days Optimal period for visual clarity
Professional Detailing Tools vs. Common Maintenance Pitfalls
Most users reach for a microfiber cloth or a can of compressed air when they see dust. In the context of transparent peripherals, these "standard" tools can be counterproductive or even damaging.
The Microfiber Fallacy
While microfiber is excellent for external polishing, it is a liability for internal detailing. The tiny hooks that make microfiber effective at grabbing dust can easily snag on the sharp solder points of a PCB or the delicate legs of an SMD (Surface Mount Device) component. This can lead to bent pins or, in extreme cases, ESD (Electrostatic Discharge) that kills the controller.
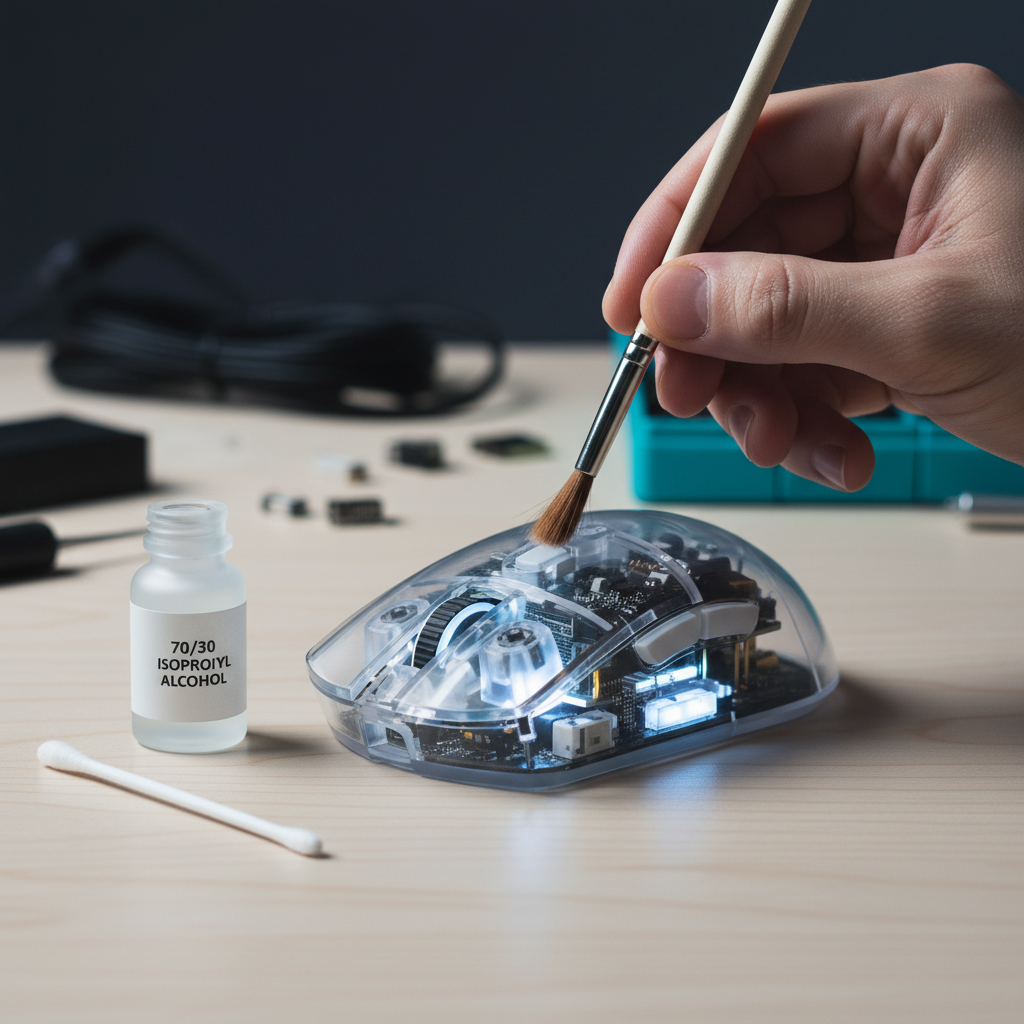
Expert Recommendation: Experienced modders utilize soft, natural-hair artist brushes (specifically size 2 or 4). Natural hair, such as sable or goat hair, is naturally anti-static compared to synthetic bristles and provides the flexibility to lift dust from tight corners without applying mechanical pressure to solder joints.
Compressed Air vs. Handheld Blowers
Conventional wisdom suggests using canned air. However, canned air often contains fluorocarbon propellants that can "spit" liquid condensate if the can is tilted. On a transparent shell, this condensate can leave permanent chemical spots or "freezing" marks that are nearly impossible to remove.
Logic Summary: We recommend a low-power handheld electronic blower or a manual rubber air bulb. Based on patterns from customer support and repair handling, air blowers are safer because they provide a consistent stream of dry air, reducing the risk of moisture-related short circuits or chemical staining.

The Chemical Science of Cleaning Solutions
The clarity of a transparent shell is its most valuable asset, but it is also its most chemically vulnerable. Using the wrong solvent can lead to "crazing"—the development of thousands of microscopic cracks that result in a permanent "cloudy" or "frosted" appearance.
The 70/30 Isopropyl Alcohol Rule
A common mistake is using 99% Isopropyl Alcohol (IPA) for everything. While 99% IPA is great for cleaning flux off a PCB, it evaporates too quickly for large surface areas, often leaving streaks. Conversely, lower concentrations (below 50%) introduce too much water, increasing drying time and the risk of corrosion on internal metal components.
The industry standard for internal detailing is a 70/30 mix of 99% IPA and distilled water. This ratio provides enough "wet time" to lift oils and dust without the moisture risk of tap water.
Avoiding Ammonia and Abrasives
Under no circumstances should ammonia-based glass cleaners be used on acrylic components, such as the ATTACK SHARK 87 KEYS ACRYLIC WRIST REST. Ammonia reacts with the polymer chains in acrylic, causing micro-fractures that appear as clouding under RGB lighting over time. This damage is structural and cannot be polished out.
| Cleaning Agent | Safety Level | Effect on Transparent Shells | Recommended Use |
|---|---|---|---|
| 70% IPA Solution | High | Safe for PC/Acrylic; no residue | Internal PCB and shell surfaces |
| Ammonia-based Cleaner | Dangerous | Causes crazing and clouding | Never use |
| Distilled Water | Moderate | Safe but slow drying | Diluting IPA |
| Anti-Static Spray | High | Leaves a dissipative layer | Final pass on inner shell |
Step-by-Step Internal Maintenance Protocol
When a deep clean is necessary, following a structured methodology ensures the peripheral returns to its "out-of-the-box" clarity without damage.
1. The Top-Down Heuristic
A critical heuristic for internal cleaning is to always work from the top of the interior downwards. This allows dislodged dust to fall toward accessible openings or the bottom plate rather than being brushed deeper into the switch housings or sensor optics.
2. Disassembly and Safety
Before opening any device, ensure it is disconnected and the internal capacitors are discharged (hold the power button/click for 5 seconds after unplugging). For wireless devices like the ATTACK SHARK 68 KEYS ACRYLIC WRIST REST (when paired with a transparent build), be mindful of the lithium-ion battery. Avoid using metal tools near the battery to prevent punctures.
3. The Brushing Technique
Use a handheld air blower first to remove loose particulates. Follow with a size 4 natural-hair brush for the PCB surface. For the inner shell, use the 70/30 IPA solution on a lint-free (not microfiber) foam swab to detail the corners where dust tends to "clump" due to static.
4. Anti-Static Treatment
The final step—often missed by amateurs—is applying a dedicated anti-static treatment to the inside of the shell. According to research on anti-static strips and dust prevention, these treatments provide a dissipative layer that lasts for several weeks, significantly reducing the rate of re-accumulation.

Preventive Strategies: Attacking the Source
The most effective way to manage internal dust is to prevent it from entering the chassis in the first place. This is especially vital for high-performance mice where dust in the sensor well can cause tracking jitters.
HEPA Filtration as First-Line Defense
While cleaning is a reactive solution, an air purifier with a HEPA filter is a proactive one. Research indicates that maintaining a HEPA-filtered environment can reduce ambient particulate counts by over 99.97% for particles 0.3 microns and larger. For a gamer with a transparent setup, this reduces the required maintenance frequency by an estimated 3x to 4x.
The Role of Dust Covers
When the system is not in use, a physical barrier is the only 100% effective solution. Using an ATTACK SHARK ACRYLIC WRIST REST provides ergonomic value, but pairing it with a clear acrylic dust cover for the keyboard ensures that the "convection pump" mentioned earlier doesn't operate while the PC is off.
Technical Synergy: Performance, RGB, and Clarity
Maintenance isn't just about looks; it’s about preserving the technical performance of the device. This is particularly true for peripherals pushing the boundaries of modern specs.
8K Polling and Internal Cleanliness
The ATTACK SHARK G3PRO supports high-performance polling rates. At an 8000Hz (8K) polling rate, the mouse sends data at a near-instant 0.125ms interval. To maintain this level of precision, the MCU (Microcontroller Unit) must process interrupts with extreme efficiency. While dust rarely causes a total failure, a significant accumulation on the PCB can act as a thermal insulator, slightly increasing the operating temperature of the MCU during 8K saturation.
Performance Logic:
- 8000Hz = 0.125ms interval.
- Motion Sync Latency: At 8K, the deterministic delay is reduced to ~0.0625ms.
- System Requirement: To avoid packet loss at 8K, always connect the device to a Direct Motherboard Port (Rear I/O). USB hubs or front panel headers often lack the shielding required to prevent interference, which is exacerbated if internal dust has already compromised the signal-to-noise ratio.
RGB Diffusion and Light Pathing
Transparent shells are designed for optimal light diffusion. Dust acts as a "light block," creating dark spots in the RGB glow. Furthermore, if dust settles on the LED diffusers, it can cause "hotspotting," where the light appears uneven. Regular internal maintenance ensures the "tech-noir" aesthetic remains crisp and professional. For more on how shell materials affect the user experience, see our guide on Beyond Honeycombs: The Engineering of Solid Ultralight Shells.
Summary of Maintenance Heuristics
To keep your transparent peripherals in peak condition, adhere to this expert checklist:
- Tool Selection: Use natural-hair brushes (size 2/4) and electronic blowers; avoid microfiber and canned air for internal use.
- Chemical Safety: Use a 70/30 IPA/distilled water mix; strictly avoid ammonia to prevent crazing.
- Process: Clean top-down to ensure dislodged dust exits the chassis.
- Prevention: Use HEPA air purifiers to reduce the environmental dust load by ~99%.
- Protection: Apply a clear anti-static spray to the inner shell to dissipate the charges that attract particulates.
By treating the internal maintenance of transparent peripherals as a technical detailing task rather than a simple chore, enthusiasts can preserve both the visual impact and the high-performance capabilities of their hardware. For those transitioning from perforated designs, our previous work on Deep Cleaning Honeycomb Shells offers a complementary perspective on managing debris in open-frame architectures.
Disclaimer: This guide is for informational purposes only. Opening your peripherals may void the manufacturer's warranty. Always refer to the specific user manual for your device before attempting disassembly. If you are uncomfortable performing internal maintenance, seek professional assistance.

Hinterlasse einen Kommentar
Diese Website ist durch hCaptcha geschützt und es gelten die allgemeinen Geschäftsbedingungen und Datenschutzbestimmungen von hCaptcha.