The journey into mechanical keyboards often starts with the satisfying click and tactile feedback of your first board. But for many enthusiasts, that initial purchase is just the beginning. A stock mechanical keyboard is a blank canvas, a well-engineered foundation waiting to be transformed into a tool that is perfectly tuned to your personal preference. This guide will explore the most impactful modifications you can make to elevate your keyboard from a great peripheral to an exceptional one, unlocking its true potential in feel and sound.

Start by Understanding Your Keyboard's Anatomy
Before diving into modifications, it's essential to understand the core components that work together to create the typing experience. A solid grasp of this anatomy will help you understand what each mod is changing and why it works.
At its heart, a keyboard consists of the case (the outer shell), the PCB (the circuit board that registers keystrokes), and the plate (which holds the switches in place). Mounted to the plate are the switches, the mechanisms responsible for the key press feel. Atop the switches sit the keycaps, and underneath the larger keys are stabilizers, which prevent them from wobbling. Each of these parts influences the final sound and feel.
Achieve Quick Wins with Simple, High-Impact Mods
Not every modification requires a complete disassembly of your keyboard. These simple upgrades can be done in minutes and provide an immediate improvement to your daily typing experience.
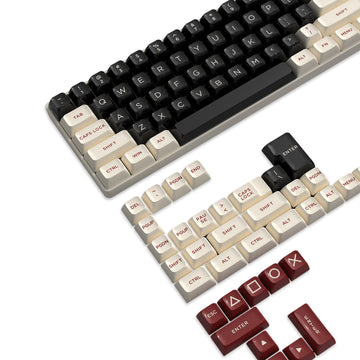
The keycaps are your primary point of contact with the keyboard, and changing them can dramatically alter both feel and sound. Most stock keyboards come with thin ABS plastic keycaps, which can feel slippery and develop a shine over time. Upgrading to a set made from PBT plastic is a popular first step, as PBT is a denser, more durable material with a pleasant textured finish.

Keycap profile—the shape and height of the caps—also affects ergonomics. Common profiles include the sculpted Cherry and OEM, or the taller, spherical SA. Experimenting with different materials and profiles is one of the easiest ways to customize your board.
One of the most overlooked acoustic upgrades has nothing to do with the board itself. Placing your keyboard on a large desk mat made of felt or fabric-topped rubber can significantly improve its sound. The mat acts as a giant dampener, absorbing vibrations that would otherwise travel into your desk and preventing unwanted hollowness or resonance.
Dive Deeper by Tuning Switches and Stabilizers
For those willing to open up their keyboard, the most profound changes come from tuning the mechanical components directly. These mods require more patience but offer a level of refinement that can't be achieved otherwise.
A stock mechanical switch often has some friction between its plastic parts, resulting in a slightly scratchy feel. Applying a thin layer of specialized lubricant, like Krytox 205g0 for linear switches or TriboSys 3203 for tactile ones, smooths out this friction.
The process involves disassembling each switch and carefully brushing lube onto the stem and housing. This results in a keystroke that feels exceptionally smooth and fluid, and a sound profile that is deeper and more muted. It is a time-consuming but highly rewarding modification.
That annoying rattle you hear from your spacebar or enter key is almost always caused by poorly tuned stabilizers. The fix involves removing the stabilizers and performing a few simple mods: clipping the small "feet" off the stem, applying dielectric grease to the wire, and lubing the housing. This combination eliminates nearly all rattle, resulting in a satisfying, solid sound for your larger keys.

How Can You Shape Your Keyboard's Sound?
Beyond the switches, the acoustics of the keyboard case play a huge role in the final sound signature. These modifications are all about controlling resonance and shaping the sound to your liking.
Many keyboard cases have a significant amount of empty space between the PCB and the bottom of the case, which acts as an echo chamber. This creates a hollow, high-pitched sound. The solution is simple: fill the void.
By cutting a piece of dense foam, such as neoprene or EVA foam, to fit snugly in the bottom of the case, you can absorb these unwanted sound waves. This mod dramatically reduces hollowness and results in a deeper, more solid, and focused sound profile.
One of the most popular acoustic mods requires nothing more than a roll of painter's tape. Applying two or three layers of tape to the back of the PCB subtly alters the sound signature of your keyboard. The tape acts as a filter, dampening higher frequencies and creating a "poppier" or "thockier" sound that many enthusiasts find incredibly pleasing.
Where Should You Begin Your Modding Journey?
The world of keyboard modification is vast, but you don't have to do everything at once. A great approach is to start with the easiest mods and progress as your confidence grows. Begin with new keycaps and a desk mat. From there, move on to tuning your stabilizers, which offers a huge improvement for a modest effort. Finally, when you're ready for a weekend project, dive into the rewarding process of lubing your switches and experimenting with case foam.
Conclusion: The Art of Keyboard Customization
Transforming your mechanical keyboard is a deeply rewarding journey. Each modification, from a simple keycap swap to the meticulous process of lubing switches, brings you closer to creating a tool that is a true extension of yourself. It’s a process of refinement that results in a keyboard that not only performs flawlessly but also provides a unique sensory experience with every keystroke. The goal isn't just to build a better keyboard, but to build your perfect keyboard.
FAQ
Which mod should I do first for the biggest impact?
For the biggest and most immediate improvement with the least amount of effort, start by tuning your stabilizers. Eliminating the rattle from your spacebar and other large keys provides a massive boost to the perceived quality and sound of your keyboard.
What is the difference between "thock," "clack," and "pop"?
These are community terms used to describe different keyboard sound profiles. "Thock" generally refers to a deep, low-pitched sound. "Clack" is a sharper, higher-pitched sound. "Pop" is a clean, rounded, and often mid-pitched sound, which can be achieved with mods like the tape mod.
Will these modifications void my keyboard's warranty?
Non-invasive mods like changing keycaps will not affect your warranty. However, opening up your keyboard to lube switches, tune stabilizers, or add foam will almost certainly void the warranty on most pre-built keyboards. Always check with your manufacturer if you are concerned.
Do I need to know how to solder to do these mods?
For the vast majority of modern keyboards, no. Most enthusiast keyboards are "hot-swappable," meaning you can remove the switches without any soldering. All of the mods described in this guide can be performed on a hot-swappable board without any need for soldering equipment.